現代のウェブ開発において、ReactとTypeScriptの組み合わせは非常に強力です。
Reactはその柔軟性と豊富なエコシステムで人気があり、TypeScriptは静的型付けにより開発者の生産性とコードの品質を向上させます。
特に複雑なアプリケーションを開発する際に、型の恩恵を受けることで、バグの早期発見や保守性の向上が期待できます。
この記事では、ReactとTypeScriptを使用して、型安全なコンポーネントを作成する方法について説明します。
具体的にはボタンやテキストといった基本的なコンポーネントを例に取りあげ、React.ComponentTypeやReact.ElementTypeなどの型を用いた実装方法を紹介します。
これにより再利用性が高く、堅牢なUIコンポーネントを作成するための知識を得ることができます。
型指定されたReactコンポーネントの作成は、単なる技術的なスキルだけでなく、コードベース全体の品質を向上させるための重要なステップです。
また動画もあるので必要に応じて活用してください。
TypeScriptで型指定して作るReactのボタンコンポーネント
まずはボタンの作成から紹介します。
基本的にはpropsで渡すものにchildrenも含めて型指定すれば問題ありません。
import React from 'react';
import Button from './Button';

const App = () => {
  return (
    <div>
      <Button color="red">
        お問い合わせ
      </Button>
    </div>
  );
};

export default App;
import React from 'react';
type ButtonProps = {
color: 'red' | 'blue';
children: React.ReactNode;
};
const Button = ({ color, children }: ButtonProps) => {
return (
<>
<button className={`btn-${color}`}>
{children}
</button>
</>
);
};
export default Button;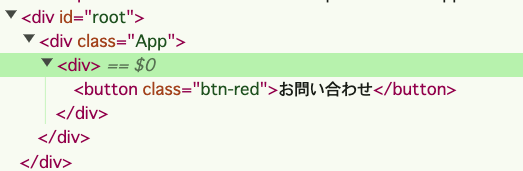
ボタンでは中のテキストをchildren、classNameを任意の文字列にして渡すことが多いですが、ボタンならではのイベントであるonClickで関数を渡すこともあります。
実は上記のコードのままonClickを渡すだけではダメで、buttonタグの型をReactから継承する必要があります。
import React from 'react';
import Button from './Button';

const App = () => {
  return (
    <div>
      {/* ここを変更 */}
      <Button color="red" onClick={() => console.log('クリック')}>
        お問い合わせ
      </Button>
    </div>
  );
};

export default App;
import React from 'react';
// ここを変更
type ButtonProps = {
color: 'red' | 'blue';
children: React.ReactNode;
} & React.ComponentProps<'button'>;
// ここを変更
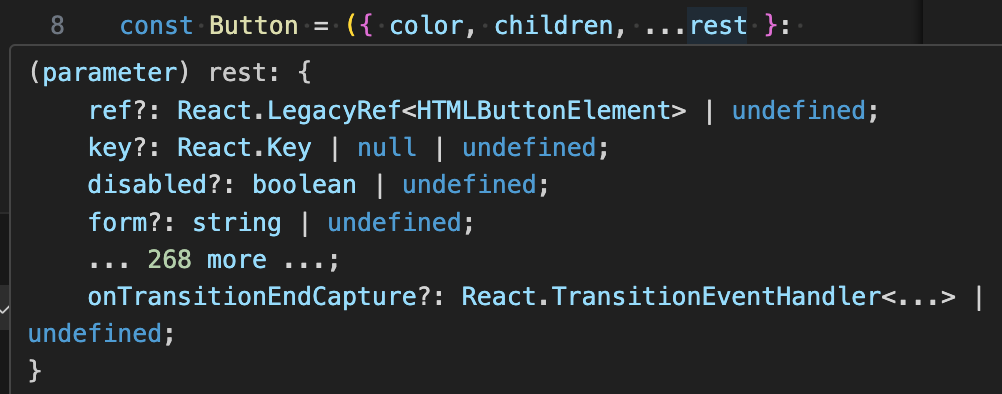
const Button = ({ color, children ...rest }: ButtonProps) => {
return (
<>
{/* ここを変更 */}
<button className={`btn-${color}`} {...rest}>
{children}
</button>
</>
);
};
export default Button;React.ComponentType<“button”>という型名がReactにて用意されているbuttonタグの型名になっていて、onClickを始めてとするオプションの属性の型名を引き継ぐことが可能になります。
そのためButtonPropsの中でonClickプロパティに型名を指定する必要はなく継承だけでOKになります。
1点注意としてはpropsでスプレッド構文を使ってrestというキーワードを渡すことになり、restの中にonClickイベントを含む必要なオプション属性が入っていて自動的にコンポーネントに渡されることになります。
TypeScriptで型指定して作るReactのテキストコンポーネント
続いてはテキストコンポーネントになります。
タイトル、キャッチコピーなどパターン化されるであろう文章はコンポーネントにすることになります。
こちらもボタン同様にpropsに渡すものを型指定することになります。
import React from 'react';
import Text from './Text';

const App = () => {
  return (
    <div>
      <Text size="lg" color="red">
        タイトル
      </Text>
      <Text size="sm" color="blue">
        本文です
      </Text>
    </div>
  );
};

export default App;
import React from 'react';
type TextProps = {
size?: 'sm' | 'lg';
color?: 'red' | 'blue';
children: React.ReactNode;
};
const Text = ({ size, color, children }: TextProps) => {
return <div className={`text-${size}-${color}`}>{children}</div>;
};
export default Text;ボタン同様にテキストとclassNameの文字列をpropsで渡しています。
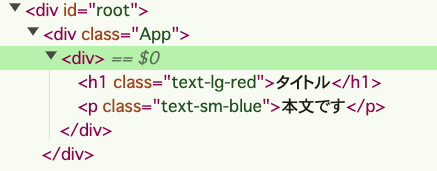
ただテキストを表示するためのHTMLタグを出し分けたいこともあります。
そのような場合は以下のように書きます。
import React from 'react';
import Text from './Text';

const Polymorphic = () => {
  return (
    <div>
      {/* ここを変更 */}
      <Text as="h1" size="lg" color="red">
        タイトル
      </Text>
      <Text as="p" size="sm" color="blue">
        本文です
      </Text>
    </div>
  );
};

export default Polymorphic;
import React from 'react';
// ここを変更
type TextProps = {
size: 'sm' | 'lg';
color: 'red' | 'blue';
children: React.ReactNode;
as?: React.ElementType;
};
// ここを変更
const Text = ({ size, color, children, as }: TextProps) => {
// ここを追加
const Component = as || 'div';
// ここを変更
return <Component className={`text-${size}-${color}`}>{children}</Component>;
};
export default Text;定数Componentというものを作成して、asというpropsで受け取ったタグ名を渡すようにしています。
デフォルトはdivタグにするため「as || “div”」と書いています。
またasの型名はReact.ElementTypeという名前になっていてHTMLタグのための型名になります。

これでHTMLタグを含めたパターン化されたテキストを作成することができます。